Introduction Those are days where we manually build the code, move the
build files to different environments causing data/file conflicts and
identifying issues consumes more amount of time. Those manual efforts are
replaced with Build Automation and Auto Deployment through DevOps Model. DevOps model is an enterprise capability that enables
Continuous Integration, Continuous Delivery, Continuous Deployment and
Continuous Monitoring of a Software. It will help to identify issues easily at
any point of time and able to resolve it in early stage. In this article, you will know about 1.
What is Continuous Integration? 2.
What is Continuous Deployment? 3.
What is Continuous Delivery? 4.
How to set up Jenkins to do Continuous
Integration with GIT and Continuous Deployment to Environments.
Continuous Integration Continuous Integration (CI) is a development practice where
developer will integrate (checkin/commit) the code into code shared repository
(like TFS, GIT). Each code integration will trigger the build process to check
if there are any issues in the code and followed by running the Unit Tests
using Unit Test Frameworks (NUnit, Junit, MSUnit). Key Advantage of enabling the build process in each code
integration will help developers to identify the defects easily and the reason for
the issues (i.e. faster feedback on the code quality) Continuous Integration has below principles, 1.
Code versioning Control
2.
Build Automation
3.
Automated Unit Testing
Continuous Deployment Continuous Deployment is a Practice to keep the code
deployable at any point of time. During this process, build will be
automatically deployed in to destination environment if there are no issues
in the “Automated Build and Automated Unit Testing Execution” phases. Continuous Delivery Continuous Delivery is a Practice which also impose to keep
the code deployable at any point of time. However, one level of manual
intervention may be present to ensure all the artifacts and configuration are valid
before moving the build to Test/Production environments. After verifying the configurations,
team/project lead can push the build (certified) to Production environments. Below are the best DevOps tools available in the market, you
can choose one based on your application needs and goals.
1.
Gradle
2.
GIT
3.
Jenkins
4.
Bamboo
5.
Docker
6.
Kubernetes
7.
Puppet Enterprise
8.
Ansible
9.
Nagios
10.
Raygun
In this article, we can use Jenkins integrating with GIT
Repo and enable the Continuous Integration and Deployment in simple steps, Prerequisites 1.
Jenkins installed on your machine 2.
.Net Code on GIT Repository
Step 1:
To create new CI & CD task, click on "New
Item"
Step 2: Select Free Style Project
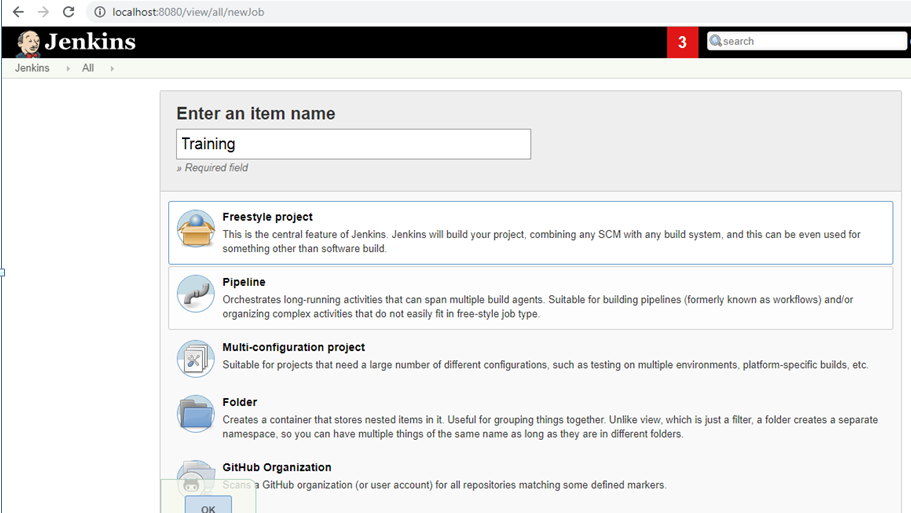
Step 3: Git Path Configuration and Manage Password Configure Git.exe
Go to --> Manage Jenkins --> Global Tool
Configuration 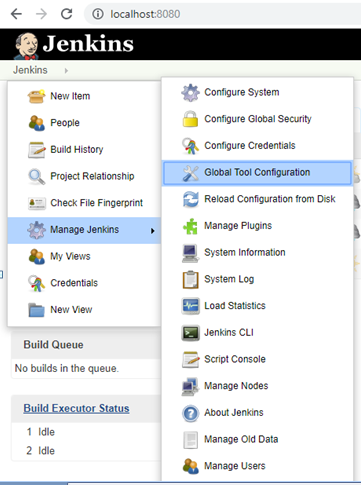
Find Git Path on your system and map it in the Configuration section as mentioned below. 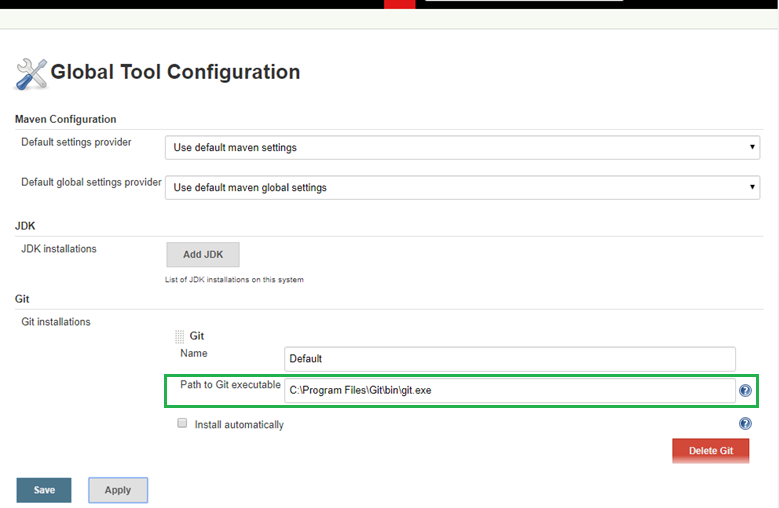
Manage Password 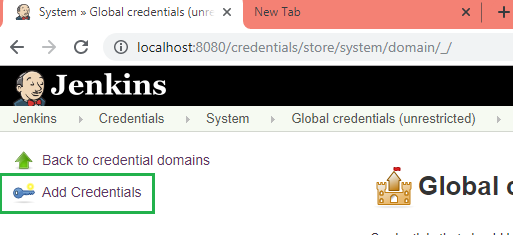
Step 4:
Enter GIT code repository and select the appropriate credentials
which we have configured in the Step3, 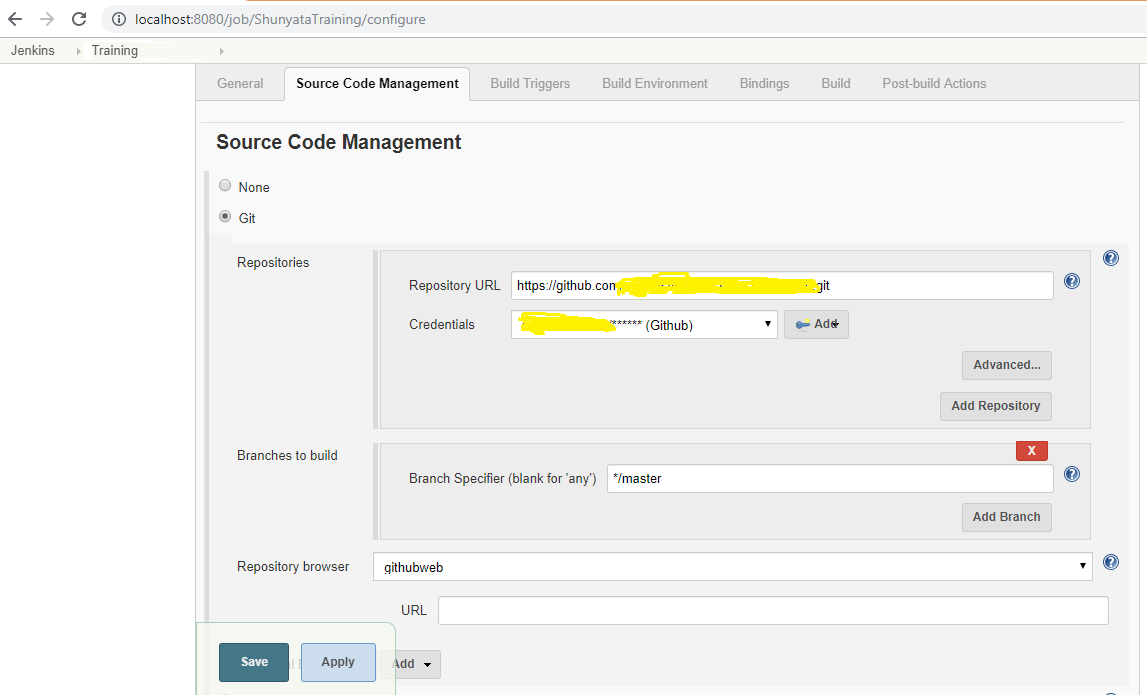
Additional Info:
If GIT exe is not able to connect to GIT Repository, you may
get the below error. 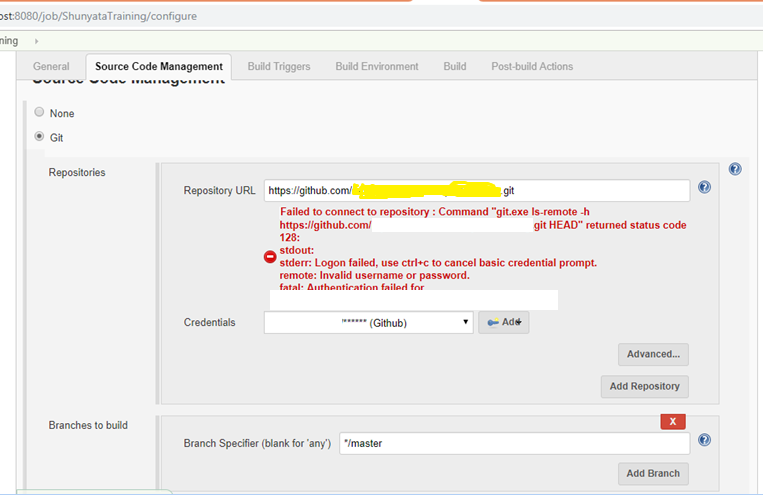
Step 5: Build Triggers
"cron" expression is used to schedule the build.
you can read about "cron" expression from this link and modify it based on your
need. 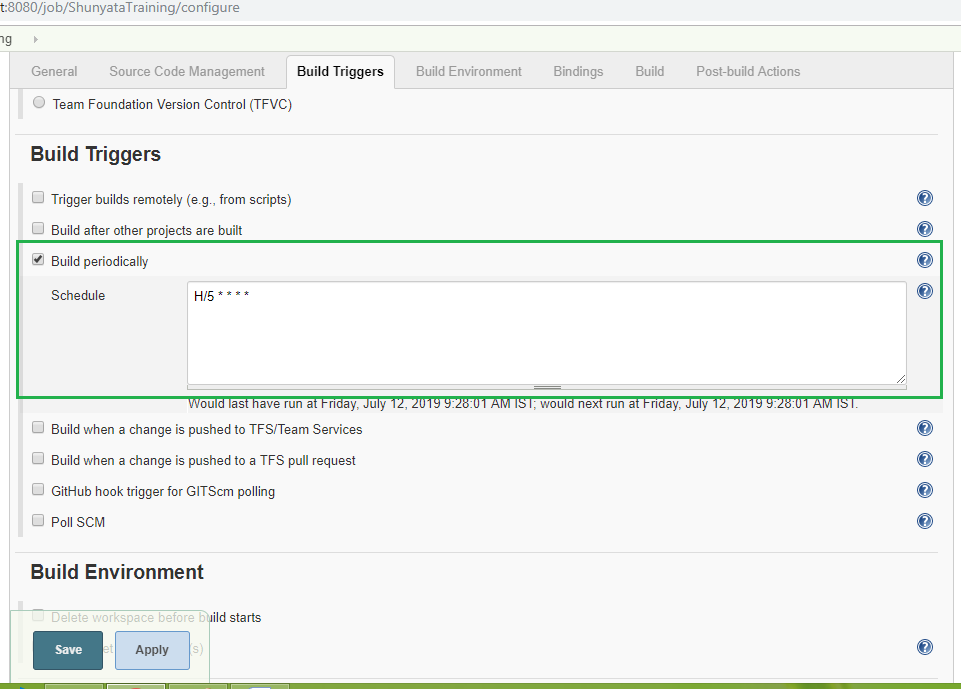
Step 6: Add Windows batch Command to Create Build directory 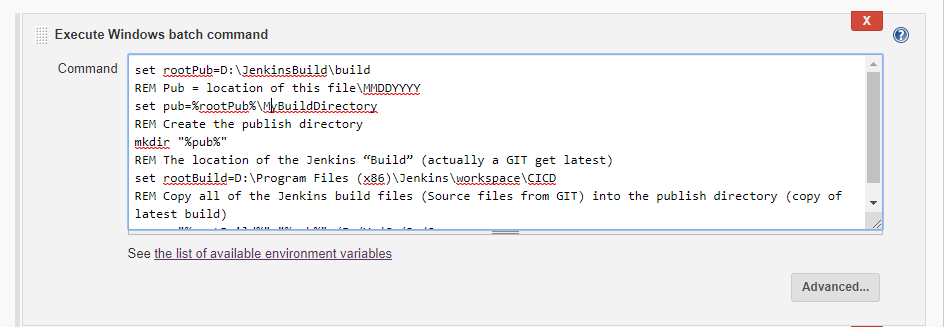
Modify the below code snippet based on your need set
rootPub=D:\JenkinsBuild\build REM Pub =
location of this file\MMDDYYYY set
pub=%rootPub%\MyBuildDirectory REM Create
the publish directory mkdir
"%pub%" REM The
location of the Jenkins “Build” (actually a GIT get latest) set
rootBuild=D:\Program Files (x86)\Jenkins\workspace\CICD REM Copy all
of the Jenkins build files (Source files from GIT) into the publish directory
(copy of latest build)
xcopy "%rootBuild%" "%pub%"
/E /Y /C /J /Q
Step 7: Build the Project 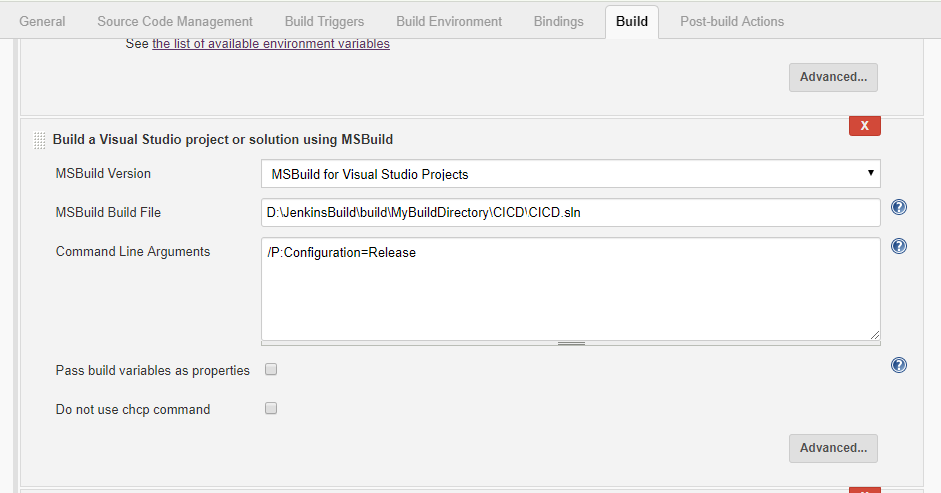
To configure the MSBuild Path, Go to --> Global
Configuration and map the Msbuild exe as mentioned below 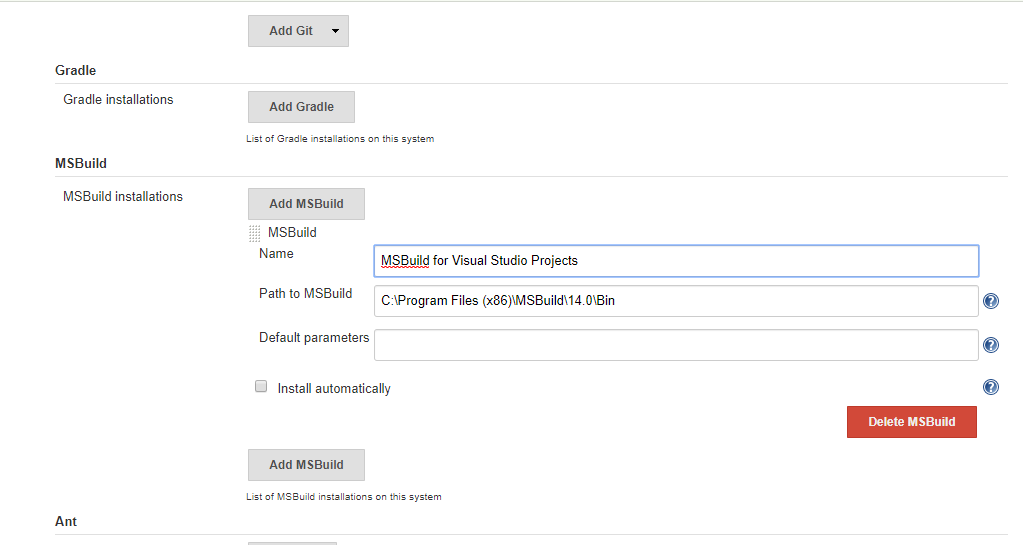
Step 8: To test the Unit Test Project
On successful completion of "Step 7" will generate
"tests dll" in the release path. In this step we will evaluate the
tests. Add Windows Batch Command 
Modify the below code snippet based on your need, del "D:\JenkinsBuild\build\MyBuildDirectory\CICD\CICD.Tests\TestResults.trx"
"C:\Program Files (x86)\Microsoft Visual Studio
10.0\Common7\IDE\MSTest.exe"
/testcontainer:"D:\JenkinsBuild\build\MyBuildDirectory\CICD\CICD.Tests\bin\Release\CICD.Tests.dll"
/resultsfile:"D:\JenkinsBuild\build\MyBuildDirectory\CICD\CICD.Tests\TestResults.trx" Step 9: Continuous Deployment Add "MsBuild" step
and add command Line Arguments. 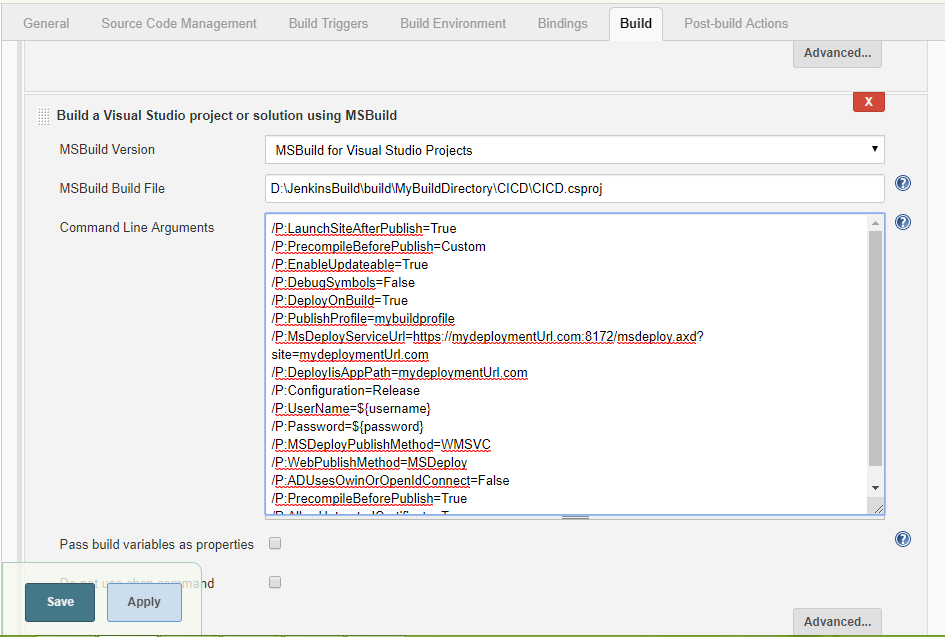
Below
mentioned the command Line Arguments that will tell the "MsBuild" to
deploy the build to the given address. You can modify it based on your need. /P:LaunchSiteAfterPublish=True /P:PrecompileBeforePublish=Custom /P:EnableUpdateable=True /P:DebugSymbols=False /P:DeployOnBuild=True /P:PublishProfile=mybuildprofile /P:MsDeployServiceUrl=https://mydeploymentUrl.com:8172/msdeploy.axd?site=mydeploymentUrl.com /P:DeployIisAppPath=mydeploymentUrl.com /P:Configuration=Release /P:UserName=${username} /P:Password=${password} /P:MSDeployPublishMethod=WMSVC /P:WebPublishMethod=MSDeploy /P:ADUsesOwinOrOpenIdConnect=False /P:PrecompileBeforePublish=True
/P:AllowUntrustedCertificate=True That’s it!! Build
will get deployed to the destination environment if the provided credentials/command line arguments are correct. Like Jenkins there are many tools to automate the
build, test and deployment process. However, we need to choose the tools based
on the application need.
|