Introduction:
This article will showcase the basic set up of angular
integrated with ASP.Net MVC. Pre-requisites: Install visual studio 2015(Even u can use 2013). Click here to
download Install Node js package for visual studio. Click
here to download
Install Typescript package for visual studio. Click
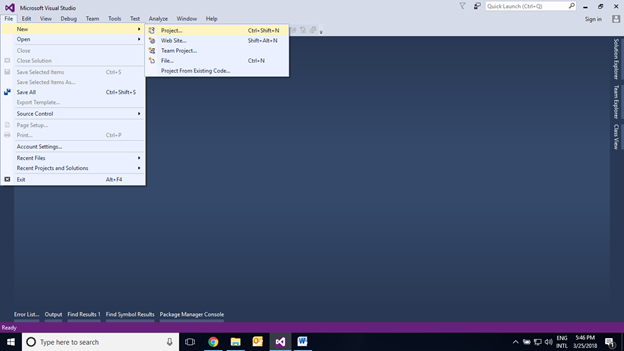
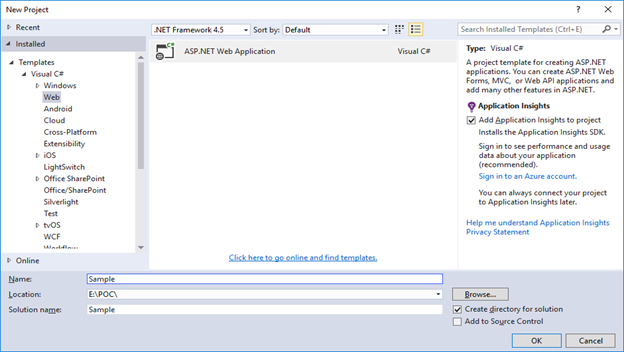
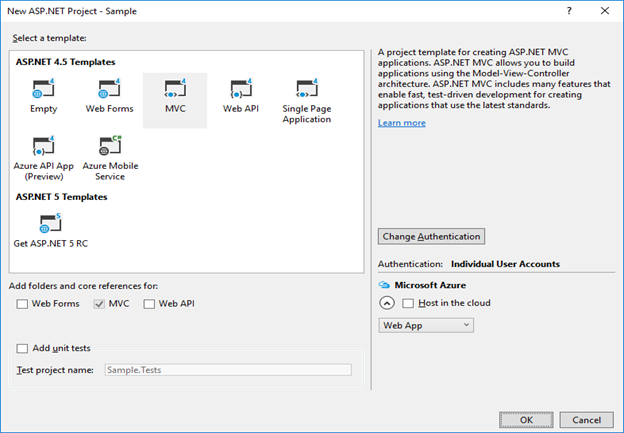
here to download Reader should have basic knowledge on MVC architecture and Angular 2 for better understanding. Create a sample MVC application with angular: Step 1: Add New MVC
Project · Create new project with the below steps.
Step 2: Add a package
file for angular ·
Add a package.json file to import required
references with below steps. ·
Right click on project, Add à New item 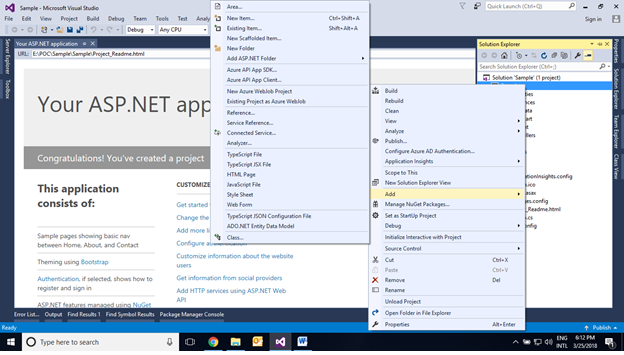
· Search
with package.json and Add. 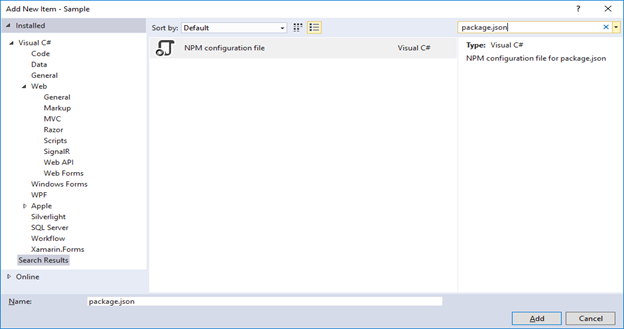
· Paste
the below code snippet in the created package.json file.
|
{
|
|
"name": "angular-quickstart",
|
|
"version": "1.0.0",
|
|
"description": "QuickStart package.json
from the documentation, supplemented with testing support",
|
|
"scripts": {
|
|
"build": "tsc -p src/",
|
|
"build:watch": "tsc -p src/ -w",
|
|
"build:e2e": "tsc -p e2e/",
|
|
"serve": "lite-server -c=bs-config.json",
|
|
"serve:e2e": "lite-server
-c=bs-config.e2e.json",
|
|
"prestart": "npm run build",
|
|
"start": "concurrently \"npm
run build:watch\" \"npm run serve\"",
|
|
"pree2e": "npm run build:e2e",
|
|
"e2e": "concurrently \"npm run serve:e2e\" \"npm
run protractor\" --kill-others --success first",
|
|
"preprotractor": "webdriver-manager
update",
|
|
"protractor": "protractor
protractor.config.js",
|
|
"pretest": "npm run build",
|
|
"test": "concurrently \"npm run build:watch\"
\"karma start karma.conf.js\"",
|
|
"pretest:once": "npm run build",
|
|
"test:once": "karma start
karma.conf.js --single-run",
|
|
"lint": "tslint ./src/**/*.ts -t verbose"
|
|
},
|
|
"keywords": [],
|
|
"author": "",
|
|
"license": "MIT",
|
|
"dependencies": {
|
|
"@angular/common": "~4.3.4",
|
|
"@angular/compiler": "~4.3.4",
|
|
"@angular/core": "~4.3.4",
|
|
"@angular/forms": "~4.3.4",
|
|
"@angular/http": "~4.3.4",
|
|
"@angular/platform-browser": "~4.3.4",
|
|
"@angular/platform-browser-dynamic": "~4.3.4",
|
|
"@angular/router": "~4.3.4",
|
|
|
|
"angular-in-memory-web-api": "~0.3.0",
|
|
"systemjs": "0.19.40",
|
|
"core-js": "^2.4.1",
|
|
"rxjs": "5.0.1",
|
|
"zone.js": "^0.8.4"
|
|
},
|
|
"devDependencies": {
|
|
"concurrently": "^3.2.0",
|
|
"lite-server": "^2.2.2",
|
|
"typescript": "~2.1.0",
|
|
|
|
"canonical-path": "0.0.2",
|
|
"tslint": "^3.15.1",
|
|
"lodash": "^4.16.4",
|
|
"jasmine-core": "~2.4.1",
|
|
"karma": "^1.3.0",
|
|
"karma-chrome-launcher": "^2.0.0",
|
|
"karma-cli": "^1.0.1",
|
|
"karma-jasmine": "^1.0.2",
|
|
"karma-jasmine-html-reporter": "^0.2.2",
|
|
"protractor": "~4.0.14",
|
|
"rimraf": "^2.5.4",
|
|
|
|
"@types/node": "^6.0.46",
|
|
"@types/jasmine": "2.5.36"
|
|
},
|
|
"repository": {}
|
|
}
|
·
After added the code, right click on file and
choose “Restore Package” option,  ·
After updated you will see the folder
“node_modules” in the project 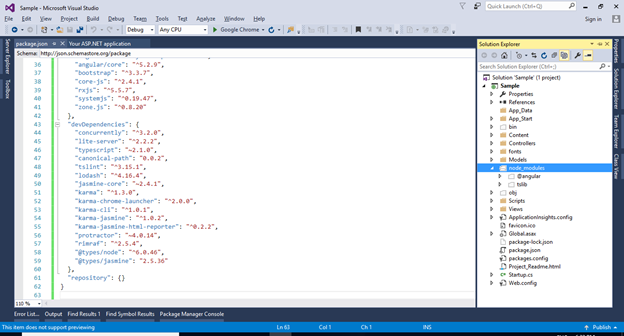
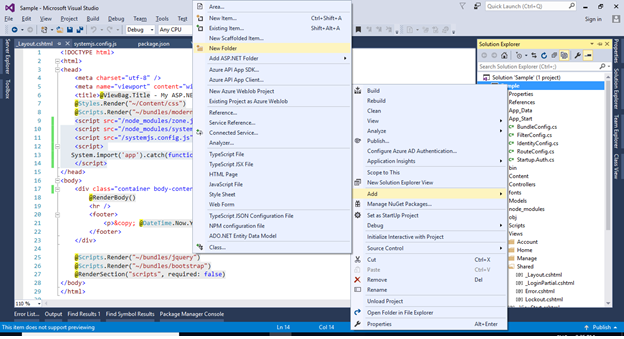
Step 3: Add system configuration java script
file. ·
Add systemjs.config.js file to specify the
reference path to the components · Right
click on project, Add à JavaScript File 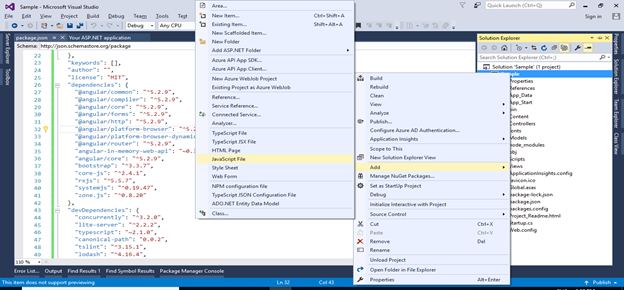
· Give
name as “systemjs.config.js” and click OK. 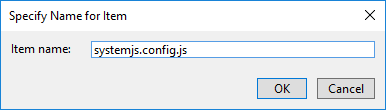
· Paste
the below code snippet in the created systemjs.config.js file.
|
System.config({
|
|
paths: {
|
|
// paths serve as alias
|
|
'npm:': 'node_modules/'
|
|
},
|
|
// map tells the System loader where to look for
things
|
|
map: {
|
|
// our app is within the app folder
|
|
'app': 'app',
|
|
|
|
// angular bundles
|
|
'@angular/core': 'npm:@angular/core/bundles/core.umd.js',
|
|
'@angular/common': 'npm:@angular/common/bundles/common.umd.js',
|
|
'@angular/compiler': 'npm:@angular/compiler/bundles/compiler.umd.js',
|
|
'@angular/platform-browser': 'npm:@angular/platform-browser/bundles/platform-browser.umd.js',
|
|
'@angular/platform-browser-dynamic': 'npm:@angular/platform-browser-dynamic/bundles/platform-browser-dynamic.umd.js',
|
|
'@angular/http': 'npm:@angular/http/bundles/http.umd.js',
|
|
'@angular/router': 'npm:@angular/router/bundles/router.umd.js',
|
|
'@angular/forms': 'npm:@angular/forms/bundles/forms.umd.js',
|
|
|
|
// other libraries
|
|
'rxjs': 'npm:rxjs',
|
|
'angular-in-memory-web-api': 'npm:angular-in-memory-web-api/bundles/in-memory-web-api.umd.js'
|
|
},
|
|
// packages tells the System loader how to load
when no filename and/or no extension
|
|
packages: {
|
|
app: {
|
|
defaultExtension: 'js',
|
|
meta: {
|
|
'./*.js': {
|
|
loader: 'systemjs-angular-loader.js'
|
|
}
|
|
}
|
|
},
|
|
rxjs: {
|
|
defaultExtension: 'js'
|
|
}
|
|
}
|
|
});
|
Step 4: Add typescript configuration file.
·
Add tsconfig.json file to specify the compiler
options for building 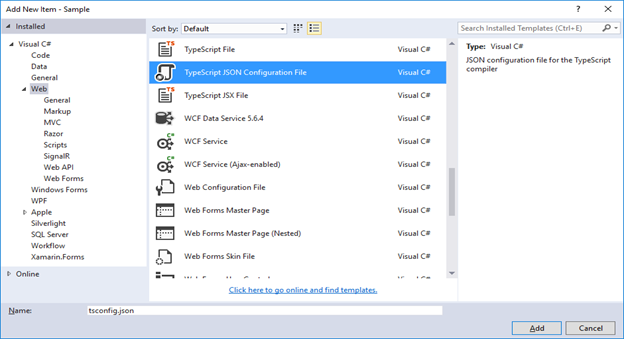
· Choose
Typescript JSON Configuration file and Paste the below code snippet in the created tsconfig.json
file.
{
"compilerOptions": {
"target": "es5",
"module": "commonjs",
"moduleResolution": "node",
"sourceMap": true,
"emitDecoratorMetadata": true,
"experimentalDecorators": true,
"lib": [ "es2015", "dom" ],
"noImplicitAny": true,
"suppressImplicitAnyIndexErrors": true
}
} |
Step 5: Route the URL
for accepting angular ·
Open “RouteConfig.cs” file and add the below
code to allow URL which accept angular input, routes.MapRoute( name:
"angular", url:
"{*anything}",
defaults: new { controller = "Home", action =
"Index" } // The view that bootstraps Angular 2
);
Step 6: Add Angular Reference ·
Add angular reference by including below snippet
in the layout file. <script src="/node_modules/zone.js/dist/zone.js"></script> <script src="/node_modules/systemjs/dist/system.src.js"></script> <script src="/systemjs.config.js"></script> <script> System.import('app').catch(function(err){ console.error(err); });
</script>
·
Add folder namely “app”,
Step 7: Setup Angular
structure ·
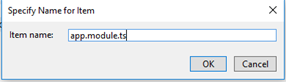
Create angular app module file “app.module.ts” 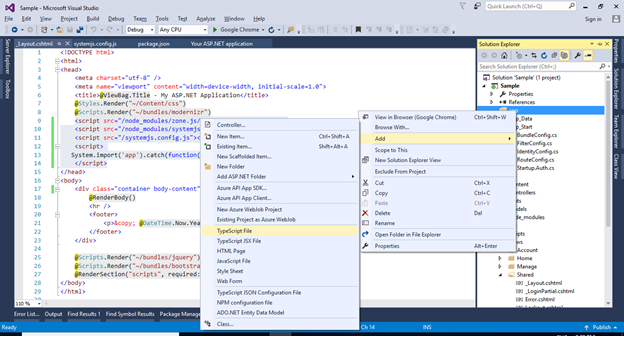
·
Paste the below code snippet in the app module, import {
NgModule } from '@angular/core'; import {
APP_BASE_HREF } from '@angular/common'; import {
BrowserModule } from '@angular/platform-browser'; import {
ReactiveFormsModule } from '@angular/forms'; import {
HttpModule } from '@angular/http'; import {
AppComponent } from './app.component'; import {
routing } from './app.routing'; import {
HomeComponent } from './Component/home.component'; import {
AboutComponent } from './Component/about.component'; @NgModule({ imports: [BrowserModule,
ReactiveFormsModule, HttpModule, routing], declarations: [AppComponent, HomeComponent,
AboutComponent], providers: [{ provide: APP_BASE_HREF,
useValue: '/' }], bootstrap: [AppComponent] })
export class
AppModule { } ·
Create angular main file “main.ts” 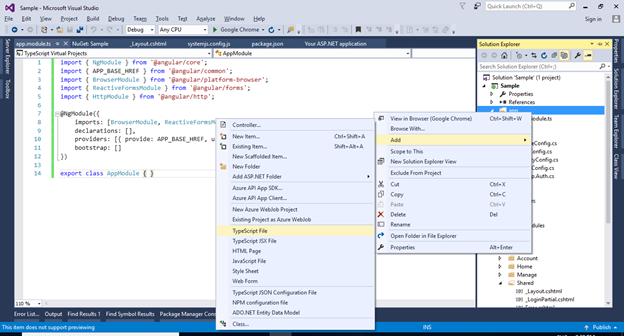
 · Paste
the below code snippet in below file, import {
platformBrowserDynamic } from '@angular/platform-browser-dynamic'; import {
AppModule } from './app.module';
platformBrowserDynamic().bootstrapModule(AppModule);
·
Create app component file “app.component.ts” and
paste the below code snippet, import {
Component } from "@angular/core"
@Component({
selector: "user-app",
template: `
<div>
<nav class='navbar
navbar-inverse'>
<div
class='container-fluid'>
<ul class='nav
navbar-nav'>
<li><a
[routerLink]="['home']">Home</a></li>
<li><a
[routerLink]="['about']">About</a></li>
</ul>
</div>
</nav>
<div class='container'>
<router-outlet></router-outlet>
</div>
</div>
`
})
export class
AppComponent {
}
·
Create app component file “app.routing.ts” and
update the routing for created modules.
·
Create Home and About Component
·
Create app component file “home.component.ts”
and paste the below code snippet, import {
Component } from "@angular/core";
@Component({
template: `<p>This is home
page.</p>`
})
export class
HomeComponent {
}
·
Create app component file “about.component.ts”
and paste the below code snippet, import {
Component } from "@angular/core";
@Component({
template: `<p>This is about
page.</p>`
})
export class
AboutComponent {
} Step 8: Adding code
reference in index.cshtml file.
·
Remove existing code and paste the below code
snippet in index.cshtml file @{
ViewBag.Title = "Index";
}
<body>
<user-app>
This is normal ASP.Net MVC</user-app>
</body> Step 9: Build and run
application
·
Load Angular Output by entering url “http://localhost:portnumber/home” 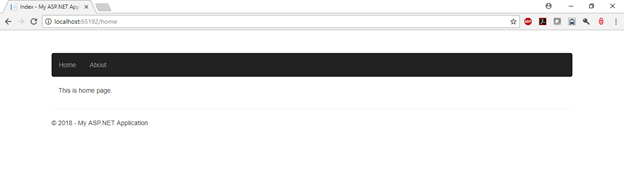 ·
Click on about link to see the navigation, 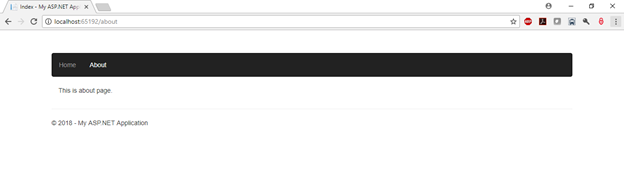
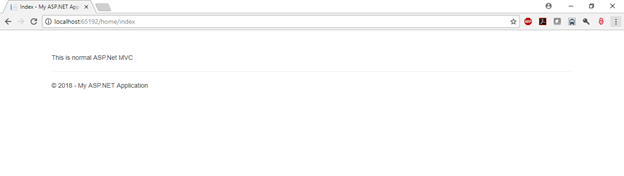
· Load
MVC Output by entering url “http://localhost:portnumber/home/index”
|