Introduction:
This article will help us to understand to turn ON/OFF LEDs
using ARDUINO based on the selection using C# Programming Language (Windows
App). Before starting this, reader should have basic understanding about serial
interface and its communication between computer and peripheral devices.
Serial
Interface: (This project uses USB interface)
Serial Interface is a communication interface between two
digital systems that transmits data as a series (bit by bit) voltage pulses. Usually
information will be sent Bit by bit over a cable. Some of Modern Serial
interfaces are USB, fireware and Ethernet.
Required
Components:
- ARDUINO
- 7 to 8 Jumper Male Pins
- Bread Board
- USB Cable – Used to connect ARDUINO with Computer to send commands.
Circuit Design:

ARDUINO
Source Code:
Given below the code to Turn
ON/OFF LEDs. Copy and Paste it in ARDUINO Code explorer and burn the code
in ARDUINO by selecting required COM Port. From Windows App, send commands from
windows application.
#define BaudRate 9600
char inchar; //Will hold the incoming character from the
Serial Port.
// Start: I am going to control the below LEDs
int isFanOn = 0;
int isLightOn = 0;
int isBoilerOn = 0;
// End
// Start: Below LED Planes
int led1 = 4;
int led2 = 5;
int led3 = 6;
// End
void setup()
{
// serial
communication
Serial.begin(BaudRate);
// prepare the
digital output pins
pinMode(led1,
OUTPUT);
pinMode(led2,
OUTPUT);
pinMode(led3,
OUTPUT);
// initially all are
off
digitalWrite(led1,
LOW);
digitalWrite(led2,
LOW);
digitalWrite(led3,
LOW);
}
void loop()
{
inchar=
Serial.read();
//
Serial.println(inchar);
if(inchar==’O’)
{
isFanOn =
0;
isLightOn =
0;
isBoilerOn
= 0;
digitalWrite(led1, LOW);
digitalWrite(led2, LOW);
digitalWrite(led3, LOW);
Serial.println(“O”);
}
if(inchar==’F’
&& isFanOn==0)
{
isFanOn = 1;
digitalWrite(led1, HIGH);
Serial.println(“F1”);
}
else if
(inchar==’F’ && isFanOn==1)
{
isFanOn = 0;
digitalWrite(led1, LOW);
Serial.println(“F0”);
}
if(inchar==’L’
&& isLightOn==0)
{
isLightOn =
1;
digitalWrite(led2, HIGH);
Serial.println(“L1”);
}
else if
(inchar==’L’ && isLightOn==1)
{
isLightOn =
0;
digitalWrite(led2, LOW);
Serial.println(“L0”);
}
if(inchar==’B’
&& isBoilerOn==0)
{
isBoilerOn =
1;
digitalWrite(led3, HIGH);
Serial.println(“B1”);
}
else if
(inchar==’B’ && isBoilerOn==1)
{
isBoilerOn =
0;
digitalWrite(led3, LOW);
Serial.println(“B0”);
}
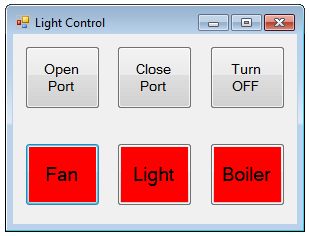
} Windows
Application Interface: (Interface to communicate with Arduino) 1.
Open Port – It will be used to open the COM Port 2.
Close Port – It will be used to close the COM
Port 3.
Fan, light and Boiler Buttons – It will send
Volt to LEDs. These buttons will act as ON/OFF switch. 4.
Turn OFF – It will make all the LEDs OFF.
We need to drag and drop the “Serial Port” control into the form and set the BaudRate to 9600 and
Port Name to COM3 (it is based on the port which you have selected for ARDUINO).
Given below the Windows Application (C#) code. Attached the complete solution in this article.
public partial class Form1 : Form
{
int isFanOn = 0;
int isLightOn = 0;
int isBoilerOn = 0;
public Form1()
{
InitializeComponent();
SetDefaultValues();
}
private void SetDefaultValues()
{
isFanOn = 0;
isLightOn = 0;
isBoilerOn = 0;
btnFan.BackColor = Color.Red;
btnLight.BackColor = Color.Red;
btnBoiler.BackColor = Color.Red;
}
private void btnOpenPort_Click(object sender, EventArgs e)
{
try
{
serialPort1.Open(); //Open
serialPort
MessageBox.Show("Serial Port
Opened!");
}
catch (Exception ex)
{
MessageBox.Show(ex.Message);
}
}
private void btnClosePort_Click(object sender, EventArgs e)
{
try
{
serialPort1.Close(); //Close
serialPort
MessageBox.Show("Serial Port
Closed!");
}
catch (Exception ex)
{
MessageBox.Show(ex.Message);
}
}
private void btnFan_Click(object sender, EventArgs e)
{
try
{
serialPort1.Write("F");
//serialPort1.Write("0#100");
}
catch (Exception ex)
{
MessageBox.Show(ex.ToString());
}
}
private void btnLight_Click(object sender, EventArgs e)
{
try
{
serialPort1.Write("L");
}
catch (Exception ex)
{
MessageBox.Show(ex.ToString());
}
}
private void btnBoiler_Click(object sender, EventArgs e)
{
try
{
serialPort1.Write("B");
}
catch (Exception ex)
{
MessageBox.Show(ex.ToString());
}
}
private void btnTurnOffAll_Click(object sender, EventArgs e)
{
serialPort1.Write("O");
}
private void serialPort1_DataReceived(object sender, SerialDataReceivedEventArgs e)
{
string callBackString =
serialPort1.ReadLine();
callBackString = callBackString.Replace("\r", "");
switch (callBackString)
{
case "F0":
isFanOn = 0;
btnFan.BackColor = Color.Red;
break;
case "F1":
isFanOn = 1;
btnFan.BackColor = Color.Green;
break;
case "L0":
isLightOn = 0;
btnLight.BackColor = Color.Red;
break;
case "L1":
isLightOn = 1;
btnLight.BackColor = Color.Green;
break;
case "B0":
isBoilerOn = 0;
btnBoiler.BackColor = Color.Red;
break;
case "B1":
isBoilerOn = 1;
btnBoiler.BackColor = Color.Green;
break;
case "O":
SetDefaultValues();
break;
}
//
MessageBox.Show(callBackString);
}
} That’s all, Follow the steps to Turn ON/OFF LEDs. 1.
Make sure you have connected to correct port
with ARDUINO. 2.
Burn the ARDUINO code. 3.
Make sure you have connected the ARDUINO. 4.
Run the Application (windows App). 5.
Click on buttons as mentioned above.
Once you familiar with the ARDUINO and its working methods, we can use Relays to connect to turn ON/OFF electrical house appliances (Extra care should be taken when dealing with 240V, please don't attempt if you are not confident). I will do share a separate article on this.
Thanks for reading this article. |