The Merge Syntax in SQL Server for Insert, Update and Delete
Table of Contents
Introduction
Starting with SQL Server 2008, you can use a MERGE statement to modify data in a target table based on data in a source table. The statement joins the target to the source by using a column common to both tables, such as a primary key. You can then insert, modify, or delete data from the target table—all in one statement—according to how the rows match up as a result of the join.
In this article, I have provided an example that demonstrates how to work with the MERGE Syntax. I created the examples on a local instance of SQL Server 2008 R2. To try them out, you’ll need to first run the following script to create and populate the tables used in the below given examples. After completing the following steps given below you can easily understand the functionality and working of the MERGE syntax:
Overview on Syntax
The syntax basically has two sections one is the target section and the other is the source section. The syntax for the Merge will be:
Merge target using Source
On Condition
When Matched then
Update set table
When Not Matched then
Insert into table values
When not Matched by Source then
Delete;
These are the condition that involved in the merge syntax. And the target is the “Target table” which needs to be loaded, and the Source is the “Source table” from which the input values are obtained.
Eg: MERGE BookInventory bi
USING BookOrder bo
ON bi.TitleID = bo.TitleID
WHEN MATCHED AND
bi.Quantity + bo.Quantity = 0 THEN
DELETE
WHEN MATCHED THEN
UPDATE
SET bi.Quantity = bi.Quantity + bo.Quantity
WHEN NOT MATCHED BY TARGET THEN
INSERT (TitleID, Title, Quantity)
VALUES (bo.TitleID, bo.Title,bo.Quantity);
In this above mentioned example I have stated that my source table is BookInventory and my destination table is BookOrder. When the values present in both the tables matches with each other then the Column of the Target table(Quantity) will be Updated else new values will be inserted into the Target table.
Syntax functionality
For example I have created two table name book and book2, one is my source table and the other is my target table.
1. Follow the below mentioned steps for creation of the target table. Run the below shown script for the creation of new table in the local database.

2. Similarly follow the above mentioned step for creation of the source table, using the script given below:
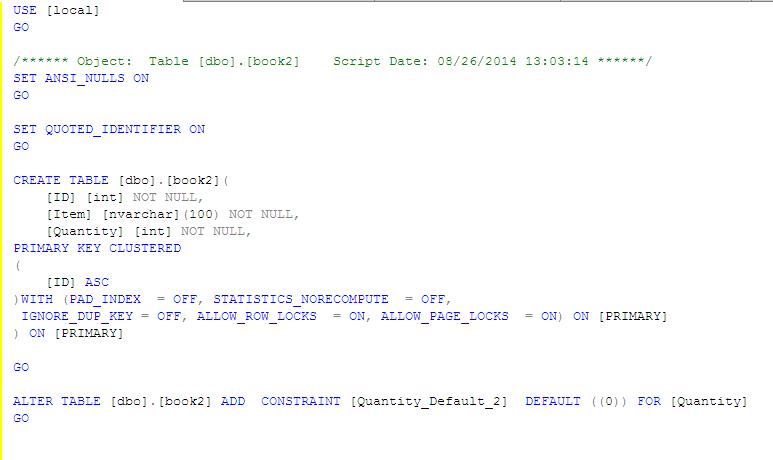
3. Now iam inserting the values into the source and the target table. The Screen shot shown below 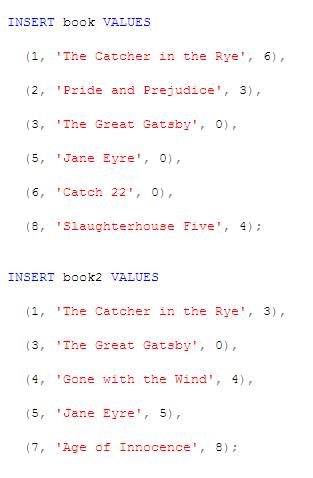
· Update Syntax using Merge
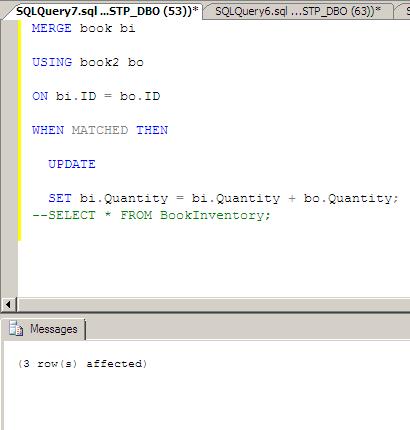
4. Now iam updating a column in the target table using source table. When observing the values in the source and target table 3 values are getting updated. This is shown in the below screen shot

· Inserting into the Target table from Source5. To insert into the target table from the source table, follow the below shown screen shot. Now the new 5 values are getting inserted into the target table from the source table. This is shown in the below mentioned screen shot for your reference:
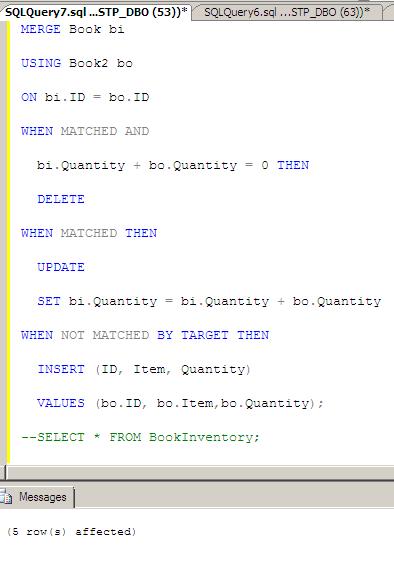 
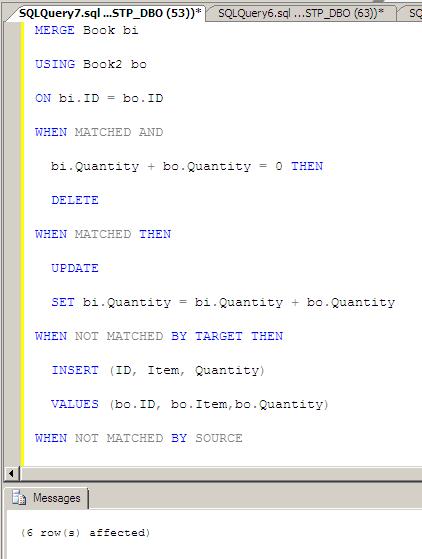
6. Now when to delete a record which fall into the condition, follow the below mentioned screen shot, In this I have put in a condition that if my target table’s “Quantity” Column has value 0 I need to delete that value. And as you see the below screen shot the value got deleted and as the result 6 rows updated.

Conclusion
As you can see, when you use the OUTPUT clause in conjunction with the MERGE statement’s other three clauses—WHEN MATCHED, WHEN NOT MATCHED [BY TARGET], and WHEN NOT MATCHED BY SOURCE—you can perform multiple DML operations and verify your data modifications easily and efficiently. A MERGE statement can simplify your code, improve performance, and reduce your development effort. And moreover it will avoid the population of duplicate record into the table. |